Garage Door Panel Replacement: What You Need to Know – Team Taylor Garage Doors of Lee’s Summit

As a homeowner who takes pride in maintaining the integrity and aesthetics of my property, dealing with issues related to the garage door is not something I take lightly. Recently, I found myself facing the dilemma of a damaged garage door panel, which not only affected the visual appeal of my home but also compromised the security and functionality of my garage. In navigating through the process of garage door panel replacement, I’ve gained valuable insights and practical knowledge that I believe every homeowner should be aware of.

I’ll share my Garage Door Repair experience and provide a comprehensive guide on what you need to know about garage door panel replacement from a homeowner’s perspective.

Understanding the Importance of Garage Door Panels:

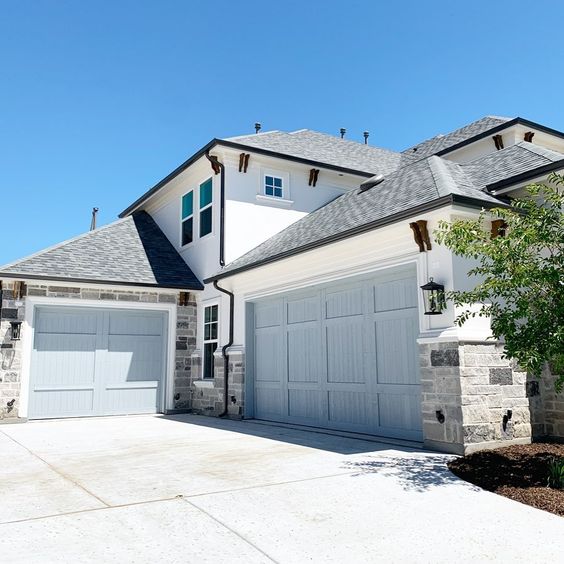
Before delving into the specifics of panel replacement, it’s essential to understand the significance of garage door panels in the overall functionality and aesthetics of your garage door. Garage door panels not only contribute to the visual appeal of your home’s exterior but also play a crucial role in providing structural support and security to your garage. Damage to one or more panels can compromise the integrity of the entire door system, leading to issues such as security vulnerabilities, insulation loss, and impaired operation.

Signs That Your Garage Door Panel Needs Replacement:

  1. Visible Damage: The most obvious sign that your garage door panel needs replacement is visible damage, such as dents, cracks, or warping. Whether caused by accidental impact, severe weather, or general wear and tear, damaged panels not only detract from the curb appeal of your home but also indicate potential structural issues that need to be addressed.
  2. Difficulty in Operation: If you notice that your garage door is experiencing difficulty in opening or closing smoothly, it could be due to damaged panels interfering with the proper functioning of the door system. Misaligned or warped panels can cause friction and resistance, resulting in strain on the opener mechanism and potential motor failure if left unaddressed.
  3. Energy Efficiency Concerns: Damaged or deteriorating garage door panels can compromise the insulation properties of your garage, leading to energy loss and increased utility bills. If you notice a significant increase in heating or cooling costs or if you feel drafts coming from your garage, it may be time to consider panel replacement to improve energy efficiency.
  4. Security Risks: A compromised garage door panel can pose security risks by providing easier access for intruders or burglars. Weak or damaged panels may be susceptible to forced entry attempts, putting your home and belongings at risk. Investing in panel replacement is essential for maintaining the security and safety of your property.

Steps for Garage Door Panel Replacement:

  1. Assessment and Measurement: Begin by assessing the extent of damage to the garage door panel and determining the appropriate size and style of the replacement panel. Take accurate measurements of the damaged panel, including width, height, and thickness, to ensure a proper fit.
  2. Sourcing Replacement Panels: Once you have identified the specifications of the replacement panel, contact your local garage door supplier or manufacturer to source the necessary parts. Provide them with the measurements and any relevant information about the make and model of your garage door to ensure compatibility.
  3. Preparation and Safety: Before starting the replacement process, ensure to disconnect the power supply to the garage door opener to prevent accidental operation. Additionally, wear appropriate safety gear, including gloves and safety glasses, to protect yourself from sharp edges and potential injury.
  4. Removal of Damaged Panel: Using a screwdriver or power drill, carefully remove the fasteners securing the damaged panel to the garage door frame. Take caution not to damage surrounding panels or components during the removal process.
  5. Installation of Replacement Panel: Once the damaged panel has been removed, align the replacement panel with the existing panels and secure it in place using the appropriate fasteners. Ensure that the panel is level and flush with the surrounding panels for a seamless appearance and proper functionality.
  6. Sealing and Finishing: Apply weather-stripping or sealant along the edges of the replacement panel to prevent drafts and moisture infiltration. Additionally, consider applying a fresh coat of paint or finish to the panel to match the aesthetics of the existing door and enhance durability.
  7. Testing and Adjustment: After installing the replacement panel, test the operation of the garage door to ensure smooth and consistent movement. Make any necessary adjustments to the alignment or tension of the door to optimize performance and minimize wear on the new panel.
  8. Maintenance and Inspection: Regularly inspect and maintain your garage door panels to prevent future damage and prolong their lifespan. Clean the panels periodically to remove dirt, debris, and corrosive substances that can accelerate deterioration. Additionally, lubricate hinges, rollers, and tracks as needed to ensure smooth operation.

Conclusion:

In Garage Door Repair, garage door panel replacement is a critical maintenance task that every homeowner may encounter at some point. By understanding the signs indicating the need for replacement and following the steps outlined in this guide, you can effectively address damaged panels and restore the functionality and aesthetics of your garage door. Whether you’re dealing with minor dents or extensive damage, timely replacement of damaged panels is essential for maintaining the security, energy efficiency, and overall value of your home. Remember to prioritize safety and accuracy throughout the replacement process, and don’t hesitate to seek professional assistance if needed. With proper care and maintenance, your garage door panels will continue to serve you reliably for years to come.

Team Taylor Garage Doors of Lee’s Summit

1012 NE Jib Ct STE D, Lee’s Summit, MO 64064, United States

816-239-2959

Hiring a Professional Roofer: Questions to Ask Before Hiring – Best Roofing Solution – Santa Ana

As a homeowner who recently went through the process of hiring a professional roofer, I understand the importance of asking the right questions before making such an important decision. Your roof is one of the most critical components of your home, and hiring the right contractor can make all the difference in ensuring its longevity and performance.

I’ll share my insights and offer valuable questions to ask potential roofers before making your choice according to Roofing Santa Ana CA.

  1. Are You Licensed and Insured? This is perhaps the most crucial question to ask any roofing contractor. A reputable roofer should be properly licensed to perform roofing work in your area, and they should also carry adequate insurance coverage, including liability insurance and workers’ compensation. Request proof of licensing and insurance before proceeding with any contractor to protect yourself and your property.
  2. How Long Have You Been in Business? Experience matters when it comes to roofing projects, so it’s essential to inquire about the contractor’s level of experience and tenure in the industry. A well-established roofing company with a proven track record is more likely to have the knowledge, skills, and resources necessary to handle your project efficiently and effectively.
  3. Can You Provide References or Examples of Past Work? Before hiring a roofer, ask for references or examples of past projects similar to yours. A reputable contractor should be able to provide references from satisfied customers and showcase their work through photos or testimonials. Take the time to contact references and ask about their experience working with the contractor to ensure they deliver quality workmanship and customer service.
  4. Do You Offer Warranties or Guarantees? A reliable roofing contractor should stand behind their workmanship and offer warranties or guarantees on their services. Inquire about the warranties provided for both labor and materials, and ensure that you receive written documentation outlining the terms and conditions. A warranty gives you peace of mind knowing that the contractor will rectify any issues that arise due to faulty installation or materials.
  5. What is Your Project Timeline? It’s essential to have a clear understanding of the project timeline before hiring a roofing contractor. Ask about their availability and scheduling constraints, as well as their estimated start and completion dates for your project. A reputable contractor should be able to provide a realistic timeline and keep you informed of any delays or changes throughout the process.
  6. What Materials Will You Use? The quality of materials used can significantly impact the durability and longevity of your roof, so it’s important to inquire about the materials that will be used for your project. Ask about the types of roofing materials available, their pros and cons, and any recommendations based on your specific needs and budget.
  7. How Will You Protect My Property During the Project? Roofing projects can be messy and disruptive, so it’s crucial to ask how the contractor will protect your property during the installation process. Inquire about measures they will take to prevent damage to landscaping, windows, siding, and other areas of your home. Ensure that they will clean up thoroughly after the project is complete.
  8. What is the Payment Schedule? Before hiring a roofer, discuss the payment schedule and ensure that you are comfortable with the terms. Avoid contractors who require full payment upfront or who pressure you into signing a contract without reviewing the terms carefully. A reputable contractor will provide a written estimate and contract outlining the payment schedule and project details.
  9. Do You Subcontract Work? Some roofing companies subcontract work to other contractors or laborers, which can affect the quality and consistency of the work. Ask whether the contractor will be performing the work themselves or subcontracting it out, and inquire about the qualifications and experience of any subcontractors involved.
  10. How Do You Handle Unforeseen Issues or Changes? Finally, ask how the contractor handles unforeseen issues or changes that may arise during the project. Inquire about their process for addressing unexpected challenges, communicating changes to the project scope or timeline, and ensuring that you are kept informed throughout the process.

In conclusion, based from Roofing Santa Ana CA, hiring a professional roofer is a significant decision that requires careful consideration and research. By asking the right questions and thoroughly evaluating potential contractors, you can ensure that you hire a reputable and reliable roofer who will deliver quality workmanship and exceptional service. Remember to prioritize experience, licensing and insurance, references, warranties, and communication when making your decision. With the right contractor by your side, you can rest assured that your roofing project will be completed with professionalism, integrity, and expertise.

Best Roofing Solution – Santa Ana

2429 W Elder Ave, Santa Ana, CA 92704, United States

714-451-4926

How to Measure for Garage Door Replacement – Affordable Garage Door Repairs of Indianapolis, LLC

If you’re considering a garage door replacement, one of the most crucial steps in the process is accurate measurement. As a homeowner who has navigated through this journey myself, I understand the importance of getting it right the first time. T

hat’s why I’m excited to share my comprehensive guide from Garage Door Repair Indianapolis IN to measuring for garage door replacement, with a focus on affordability and precision. So let’s dive in and ensure your garage door replacement project goes smoothly!

  1. Understanding the Basics: Before we get into the specifics of measuring, it’s essential to have a basic understanding of how garage door sizing works. Garage doors come in standard sizes based on the width and height of the opening. The most common residential garage door sizes are single-car (8′ x 7′ or 9′ x 7′) and double-car (16′ x 7′). However, custom sizes are also available to accommodate non-standard openings.
  2. Gathering the Necessary Tools: To accurately measure for a garage door replacement, you’ll need a few basic tools:
    • Tape measure
    • Step ladder or stool
    • Pencil and paper for notes
    • Level (optional but recommended)
    • Assistant (optional but helpful for larger doors)
  3. Taking Width Measurements: Start by measuring the width of the garage door opening. Position your tape measure at the widest point of the opening, typically near the center. Measure from one side to the other in feet and inches, rounding up to the nearest inch for accuracy. Repeat this process at multiple points along the width of the opening to ensure consistency.
  4. Measuring Height: Next, measure the height of the garage door opening. Position your tape measure at the highest point of the opening, typically near the center. Measure from the floor to the underside of the header or ceiling, again rounding up to the nearest inch. Like with width measurements, take multiple measurements at different points along the height of the opening to ensure accuracy.
  5. Checking for Squareness: To ensure a proper fit, it’s essential to check if the garage door opening is square. Use a level to verify that the sides and top of the opening are perpendicular to each other. If the opening is not square, note the degree of deviation and adjust your measurements accordingly. This step is crucial for custom or non-standard garage door sizes.
  6. Considering Headroom and Side Room: In addition to width and height, it’s essential to consider headroom and side room requirements for the new garage door. Headroom refers to the space between the top of the door opening and the ceiling or overhead structure. Side room refers to the space on either side of the opening required for track installation. Measure and note these dimensions to ensure compatibility with the new door.
  7. Determining Spring System: Take note of the existing spring system used to counterbalance the garage door. Standard spring systems include torsion springs mounted above the door or extension springs mounted on the sides. Understanding the type and configuration of the spring system is essential for selecting the appropriate replacement door and hardware.
  8. Accounting for Clearance Requirements: Finally, consider any clearance requirements that may affect the installation of the new garage door. This includes clearance for tracks, rollers, and hardware, as well as clearance for the door to open and close freely without obstruction. Measure and note these clearances to ensure proper installation and operation of the replacement door.
  9. Consulting with a Professional: While measuring for a garage door replacement is a relatively straightforward process, it’s always a good idea to consult with a professional for expert guidance and advice. A qualified garage door technician can help you navigate through the measurement process, address any questions or concerns, and recommend the best options for your specific needs and budget.
  10. Choosing Affordable Garage Door Repairs of Indianapolis, LLC: When it comes to affordable and reliable garage door replacement services in the Indianapolis area, look no further than Affordable Garage Door Repairs of Indianapolis, LLC. With years of experience and a commitment to customer satisfaction, we specialize in providing high-quality garage door replacements at competitive prices. Our team of skilled technicians will work closely with you to ensure accurate measurements, seamless installation, and long-lasting performance. Whether you’re in need of a standard-size replacement door or a custom solution, you can trust us to deliver exceptional results every time.

In conclusion, as per Garage Door Repair Indianapolis IN, measuring for a garage door replacement is a critical step in ensuring a successful and hassle-free installation process. By following these tips and guidelines, you can accurately measure your garage door opening, consider important factors such as squareness and clearance requirements, and make informed decisions about your replacement door. And when it comes to affordable and reliable garage door replacement services, remember to choose Affordable Garage Door Repairs of Indianapolis, LLC for quality you can trust.

Affordable Garage Door Repairs of Indianapolis, LLC

1111 E 54th St # 171, Indianapolis, IN 46220

317-372-5337

Tips for Prolonging the Life of Replaced Concrete Surfaces – Grapevine Concrete Crew

As a homeowner who recently invested in replacing concrete surfaces around my property, I’ve learned firsthand the importance of prolonging their lifespan. While replacing concrete is a significant investment, it’s equally crucial to take proactive measures to ensure that the new surfaces remain durable, functional, and visually appealing for years to come.

I’ll share my Concrete Contractor Grapevine TX journey and insights into the various strategies and techniques I’ve employed to extend the lifespan of replaced concrete surfaces, from routine maintenance to preventative measures and sustainable practices.

  1. Regular Cleaning and Maintenance: One of the simplest yet most effective ways to extend the lifespan of replaced concrete surfaces is through regular cleaning and maintenance. Keeping the surfaces clean and free of dirt, debris, and organic matter helps prevent staining, discoloration, and deterioration over time. I’ve made it a habit to sweep or rinse off my concrete surfaces regularly and use a mild detergent or concrete cleaner as needed to remove stubborn stains or buildup. Additionally, sealing the concrete periodically can help protect it from moisture penetration, UV damage, and other environmental factors that can contribute to premature wear and tear.
  2. Proper Drainage and Water Management: Proper drainage is essential for preserving the integrity of replaced concrete surfaces, particularly in outdoor areas such as driveways, patios, and walkways. Water accumulation and pooling can lead to erosion, cracking, and other forms of damage over time. To mitigate these risks, I’ve taken steps to ensure that water drains away from the concrete surfaces effectively, either through grading, slope adjustments, or the installation of French drains or gutters. By managing water effectively, I’ve been able to prevent moisture-related issues and prolong the lifespan of my concrete surfaces.
  3. Preventing Freeze-Thaw Damage: For homeowners in regions with cold climates, preventing freeze-thaw damage is crucial for extending the lifespan of replaced concrete surfaces. Freeze-thaw cycles occur when water penetrates the pores of the concrete, freezes, and expands, causing the concrete to crack, spall, or deteriorate over time. To prevent freeze-thaw damage, I’ve taken measures such as applying a quality concrete sealer, ensuring proper drainage, and using deicing agents sparingly and responsibly during the winter months. These preventative measures help protect my concrete surfaces from the damaging effects of freeze-thaw cycles and ensure their long-term durability.
  4. Addressing Cracks and Damage Promptly: Despite our best efforts, cracks and damage may still occur on replaced concrete surfaces over time. It’s essential to address these issues promptly to prevent them from worsening and compromising the integrity of the concrete. I’ve made it a point to inspect my concrete surfaces regularly for signs of cracks, spalling, or other forms of damage and to take corrective action as needed. Depending on the severity of the damage, this may involve filling cracks with a concrete patching compound, resurfacing the surface, or even considering partial replacement if the damage is extensive. By addressing cracks and damage promptly, I’ve been able to prevent further deterioration and prolong the lifespan of my concrete surfaces.
  5. Utilizing Sustainable Practices: As a homeowner committed to sustainability, I’ve also explored eco-friendly practices for extending the lifespan of replaced concrete surfaces. For example, using permeable or porous concrete materials allows water to infiltrate the surface and replenish groundwater supplies, reducing the risk of water runoff and erosion. Additionally, incorporating recycled materials into concrete mixtures or opting for concrete alternatives such as recycled glass or aggregates can reduce the environmental impact of construction projects while still delivering durable and aesthetically pleasing results. By embracing sustainable practices, I’ve not only extended the lifespan of my concrete surfaces but also minimized their environmental footprint for future generations.
  6. Investing in Professional Maintenance Services: In addition to DIY maintenance efforts, I’ve found value in investing in professional maintenance services for my replaced concrete surfaces. Professional contractors have the expertise, tools, and resources to perform thorough inspections, repairs, and preventative maintenance to ensure the longevity and performance of concrete surfaces. Whether it’s applying specialized sealants, performing routine inspections, or conducting repairs, professional maintenance services can help identify and address potential issues before they escalate, saving time, money, and hassle in the long run.

In conclusion, by following Concrete Contractor Grapevine TX, extending the lifespan of replaced concrete surfaces requires a combination of proactive maintenance, preventative measures, and sustainable practices. By implementing regular cleaning and maintenance routines, ensuring proper drainage and water management, preventing freeze-thaw damage, addressing cracks and damage promptly, utilizing sustainable practices, and investing in professional maintenance services, homeowners can maximize the durability, functionality, and visual appeal of their concrete surfaces for years to come. As I continue on my journey of homeownership, I’m committed to preserving and protecting my replaced concrete surfaces to ensure they stand the test of time.

Grapevine Concrete Crew

1245 S Pine St, Grapevine, TX 76051, United States

817-859-6679

Qualities to Look for in an Air Conditioning Contractor – Abundant Air

As a homeowner, I understand the importance of having a reliable and efficient air conditioning system, especially during the sweltering summer months. Whether it’s installing a new unit, repairing a malfunctioning system, or providing regular maintenance, choosing the right air conditioning contractor is crucial for ensuring the comfort and longevity of your HVAC system. Through my own experiences and research, I’ve discovered several key qualities to look for when selecting an air conditioning contractor.

In this article, I’ll share my insights and offer practical advice on finding the perfect fit for your HVAC needs in reference to Air Conditioning Contractor.

1. Professionalism

One of the first qualities to assess when choosing an air conditioning contractor is professionalism. A reputable contractor should demonstrate professionalism in every aspect of their business, from initial communication to project completion. Look for contractors who are punctual, courteous, and attentive to your needs. They should communicate clearly, provide detailed explanations of their services, and answer any questions or concerns you may have promptly.

2. Experience and Expertise

Experience and expertise are essential qualities to look for in an air conditioning contractor. An experienced contractor will have a thorough understanding of HVAC systems and the necessary skills to handle various installation, repair, and maintenance tasks efficiently. Look for contractors who have been in the industry for several years and have a proven track record of delivering high-quality workmanship.

3. Licensing and Certification

When hiring an air conditioning contractor, it’s crucial to verify that they are properly licensed and certified to perform HVAC work in your area. Licensing requirements vary by state, so be sure to check local regulations to ensure compliance. Additionally, look for contractors who hold certifications from reputable organizations such as NATE (North American Technician Excellence) or ACCA (Air Conditioning Contractors of America), as these indicate a commitment to professionalism and industry best practices.

4. Reputation and References

A contractor’s reputation speaks volumes about the quality of their work and level of customer satisfaction. Before hiring an air conditioning contractor, take the time to research their reputation online by reading reviews and testimonials from previous clients. Additionally, ask the contractor for references and contact past customers to inquire about their experiences. A contractor with a solid reputation and satisfied customers is more likely to deliver reliable service.

5. Transparent Pricing and Estimates

Transparent pricing and accurate estimates are essential when hiring an air conditioning contractor. A reputable contractor should provide detailed written estimates for all services, including labor, materials, and any additional fees or charges. Beware of contractors who offer unusually low estimates or refuse to provide written quotes, as these may be signs of hidden costs or poor quality workmanship.

6. Warranty and Guarantees

Look for air conditioning contractors who stand behind their work with comprehensive warranties and guarantees. A reputable contractor should offer warranties on both labor and parts, ensuring that any issues that arise after installation or repair are promptly addressed at no additional cost to you. Be sure to carefully review the terms and conditions of the warranty to understand what is covered and for how long.

7. Commitment to Customer Service

Exceptional customer service is a hallmark of a reputable air conditioning contractor. Look for contractors who prioritize customer satisfaction and go above and beyond to ensure a positive experience. They should be responsive to your needs, address any concerns or complaints promptly, and strive to exceed your expectations at every step of the process.

8. Up-to-Date Technology and Equipment

The HVAC industry is constantly evolving, with new technologies and equipment emerging to improve energy efficiency and performance. When selecting an air conditioning contractor, look for one who stays current with the latest advancements in the field. Contractors who invest in up-to-date technology and equipment are better equipped to provide efficient and effective solutions for your HVAC needs.

9. Environmental Responsibility

As environmental concerns continue to grow, many homeowners are seeking HVAC solutions that are eco-friendly and energy-efficient. Look for air conditioning contractors who prioritize environmental responsibility by offering energy-efficient products and sustainable practices. Contractors who are knowledgeable about green HVAC solutions can help you reduce your carbon footprint and lower your utility bills.

10. Clear Communication and Follow-Up

Effective communication is essential for a successful working relationship with your air conditioning contractor. Look for contractors who communicate clearly and consistently throughout the project, providing updates on progress, timelines, and any unexpected developments. Additionally, choose a contractor who follows up after the completion of the project to ensure your satisfaction and address any lingering concerns.

Conclusion

Overall, based from Air Conditioning Contractor, choosing the right air conditioning contractor is a critical decision that can have a significant impact on the comfort and efficiency of your home. By prioritizing qualities such as professionalism, experience, licensing, reputation, transparent pricing, warranties, customer service, technological expertise, environmental responsibility, and clear communication, you can find a contractor who meets your needs and exceeds your expectations. Remember to take the time to research and interview multiple contractors before making your final decision, and don’t hesitate to ask questions and seek references. With the right contractor by your side, you can enjoy peace of mind knowing that your HVAC system is in capable hands.

Abundant Air

817-285-8000

Keeping Up with Maintenance: The Importance of Concrete Driveway Care Schedules – Concrete Crew

Maintaining the beauty and functionality of my concrete driveway has always been a top priority for me as a homeowner. A well-maintained driveway not only enhances the curb appeal of my home but also ensures safety, durability, and longevity.

In reference to Concrete Contractor Carrollton TX article, I’ll delve into the importance of implementing concrete driveway care schedules and share valuable insights on how to keep your driveway in optimal condition year-round.

Understanding the Importance of Maintenance:

First and foremost, it’s crucial to understand why regular maintenance is essential for concrete driveways. Concrete is a durable material, but it’s not immune to wear and tear caused by factors such as weather exposure, vehicle traffic, and environmental contaminants. Without proper maintenance, concrete driveways can develop cracks, stains, spalling, and other forms of damage over time, compromising their appearance and structural integrity.

Preventing Costly Repairs:

Implementing a proactive maintenance schedule for your concrete driveway can help prevent minor issues from escalating into costly repairs down the road. By addressing small cracks, stains, or surface imperfections promptly, you can prevent them from worsening and requiring extensive repairs or replacements. Regular maintenance also allows you to identify potential issues early on and take corrective action before they escalate into larger problems.

Enhancing Curb Appeal:

Maintaining a well-kept driveway enhances the overall curb appeal of your home and creates a positive first impression for visitors and passersby. A clean, well-maintained driveway contributes to the overall aesthetics of your property and reflects pride of ownership. By investing time and effort into driveway maintenance, you can elevate the appearance of your home and enhance its value in the eyes of potential buyers.

Ensuring Safety and Functionality:

Safety is another critical aspect of driveway maintenance. Cracks, potholes, and uneven surfaces pose tripping hazards for pedestrians and can potentially damage vehicles. Regular maintenance helps keep your driveway smooth, level, and free of debris, reducing the risk of accidents and injuries. Additionally, maintaining proper drainage and addressing drainage issues promptly helps prevent water buildup and minimize the risk of slippery surfaces.

Long-Term Durability:

Regular maintenance extends the lifespan of your concrete driveway by protecting it from premature deterioration and structural damage. By sealing cracks, applying protective coatings, and addressing surface imperfections, you can prevent moisture intrusion, UV damage, and other forms of wear and tear that can weaken the concrete over time. A well-maintained driveway is more resistant to cracking, staining, and surface degradation, ensuring long-term durability and performance.

Components of a Concrete Driveway Care Schedule:

Now that we understand the importance of maintenance let’s delve into the components of a concrete driveway care schedule:

  1. Regular Cleaning: Implement a routine cleaning schedule to remove dirt, debris, and stains from your driveway surface. Use a broom, leaf blower, or pressure washer to remove surface contaminants and maintain a clean appearance. Regular cleaning helps prevent dirt buildup, mold growth, and staining, preserving the aesthetics of your driveway.
  2. Sealing: Apply a high-quality concrete sealer to protect your driveway from moisture penetration, UV damage, and chemical exposure. Depending on the type of sealer used, reapplication may be necessary every few years to maintain optimal protection. Sealing helps prolong the lifespan of your driveway and enhances its resistance to stains and surface deterioration.
  3. Crack Repair: Inspect your driveway regularly for cracks, fissures, or surface damage and address them promptly to prevent water infiltration and further deterioration. Use a suitable concrete patching compound or filler to repair cracks and restore the integrity of the surface. Regular crack repair helps prevent minor issues from escalating into larger problems and extends the lifespan of your driveway.
  4. Stain Removal: Treat oil spills, grease stains, and other surface stains promptly to prevent them from penetrating the concrete and causing permanent discoloration. Use appropriate cleaning solutions and techniques to remove stains effectively without damaging the surface. Regular stain removal helps preserve the appearance of your driveway and enhances its overall cleanliness.
  5. Snow and Ice Management: In regions prone to snow and ice, implement a winter maintenance plan to protect your driveway from damage caused by freeze-thaw cycles and ice melt products. Use snow shovels, snow blowers, or ice melt products sparingly and avoid using harsh chemicals that can damage the concrete surface. Proper snow and ice management help prevent surface deterioration and minimize the risk of slip and fall accidents.

Conclusion:

In conclusion, according to Concrete Contractor Carrollton TX, implementing a concrete driveway care schedule is essential for maintaining the beauty, functionality, and longevity of your driveway. By prioritizing regular maintenance tasks such as cleaning, sealing, crack repair, stain removal, and snow and ice management, you can protect your driveway from damage and ensure its safety, durability, and curb appeal for years to come. Investing time and effort into driveway maintenance pays off in the long run by preventing costly repairs, enhancing property value, and prolonging the lifespan of your concrete surface. With a proactive approach to maintenance, you can enjoy a beautiful, well-maintained driveway that enhances the overall aesthetics and value of your home.

Concrete Crew

2535 Oak Tree Dr, Carrollton, TX 75006, United States

972-845-893

How to Repair Cracks in Concrete Driveways? – Concrete Crew Flower Mound

As a homeowner who takes pride in maintaining my property, I understand the frustration that comes with discovering cracks in a concrete driveway. Cracks not only detract from the appearance of the driveway but can also worsen over time if left untreated, leading to more extensive damage and costly repairs.

In this comprehensive Concrete Contractor Flower Mound TX guide, I’ll walk you through the steps to effectively repair cracks in concrete driveways, helping you restore the beauty and integrity of your driveway with confidence.

Assessing the Damage:

The first step in repairing cracks in a concrete driveway is to assess the extent of the damage. Inspect the driveway carefully, noting the size, depth, and location of each crack. Cracks smaller than a quarter-inch wide are considered minor and can typically be repaired using simple DIY methods. However, larger cracks or those accompanied by significant shifting or settlement may require professional intervention.

Gathering the Necessary Tools and Materials:

Before beginning the repair process, gather all the tools and materials you’ll need. This typically includes a wire brush, chisel or hammer, concrete cleaner, concrete patching compound or filler, trowel, gloves, safety glasses, and a bucket for mixing the patching material. Additionally, consider wearing protective clothing and a dust mask to minimize exposure to dust and debris.

Preparing the Crack for Repair:

Start by cleaning the crack thoroughly to remove any dirt, debris, and loose material. Use a wire brush or pressure washer to scrub the crack and surrounding area, ensuring a clean and smooth surface for the patching material to adhere to. For stubborn stains or residues, you may need to use a concrete cleaner or degreaser.

Filling the Crack:

Once the crack is clean and dry, it’s time to fill it with a suitable patching compound or filler. Choose a product specifically designed for repairing concrete driveways, such as a latex-based concrete patching compound or a hydraulic cement filler. Follow the manufacturer’s instructions for mixing and applying the patching material, ensuring proper adhesion and a smooth finish.

Smoothing and Finishing:

After filling the crack, use a trowel or putty knife to smooth the surface of the patching material, ensuring it is level with the surrounding concrete. For larger cracks or deep voids, you may need to apply multiple layers of patching material, allowing each layer to dry completely before applying the next. Once the patch is dry, use a fine-grit sandpaper or abrasive pad to smooth any rough edges or imperfections.

Sealing the Repair:

To provide added protection and prevent future damage, consider sealing the repaired crack with a quality concrete sealer. Choose a sealer specifically formulated for use on driveways, such as a penetrating acrylic or epoxy sealer. Apply the sealer according to the manufacturer’s instructions, using a roller or sprayer to ensure even coverage. Allow the sealer to dry completely before allowing foot or vehicle traffic on the driveway.

Regular Maintenance and Inspection:

After completing the repair, it’s essential to perform regular maintenance and inspections to monitor the condition of the driveway and address any new cracks or damage promptly. Keep the driveway clean and free of debris, and avoid using harsh chemicals or deicing agents that can damage the concrete surface. Additionally, consider applying a fresh coat of sealer every few years to maintain the integrity and appearance of the driveway.

Conclusion:

In conclusion, according to Concrete Contractor Flower Mound TX, repairing cracks in a concrete driveway is a manageable DIY task that can be accomplished with the right tools, materials, and techniques. By following the steps outlined in this guide and investing a little time and effort, you can restore your driveway’s beauty and durability, prolonging its lifespan and enhancing your home’s curb appeal for years to come.

Concrete Crew Flower Mound

2001 Timber Creek Rd, Flower Mound, TX 75028, United States

972-846-9387

Maximizing Space with Compact Garage Door Options – JT’s Overhead Doors

In the realm of modern living, where every square foot counts, the garage often serves as more than just a place to park vehicles. It has become an extension of our homes—a multifunctional space for storage, hobbies, and even relaxation. However, one challenge that many homeowners face is the limited space available, especially when it comes to the garage door. Fortunately, advancements in technology and design have brought forth a plethora of compact garage door options that not only maximize space but also enhance the overall functionality and aesthetics of your home.

In reference to Garage Door Repair, gone are the days when garage doors were bulky, cumbersome structures that occupied precious overhead space. Today, innovative solutions have emerged, offering sleek and space-saving alternatives that cater to various architectural styles and lifestyle needs. From sectional doors to roller shutters, the options are diverse, allowing homeowners to choose the perfect fit for their space constraints and design preferences.

One of the most popular choices for maximizing space in the garage is the sectional garage door. Unlike traditional up-and-over doors, sectional doors are composed of individual panels that slide vertically upwards, parallel to the ceiling. This design eliminates the need for additional clearance space, making it ideal for garages with limited headroom. Additionally, sectional doors come in a variety of materials, including steel, aluminum, and wood, allowing for customization to match the aesthetic of your home.

Another space-efficient option is the roller shutter garage door. As the name suggests, these doors roll up into a compact coil above the opening, freeing up valuable ceiling space. Roller shutters are known for their durability, security, and insulation properties, making them a practical choice for homeowners seeking both space optimization and functionality. Moreover, with advancements in automation technology, roller shutter doors can be easily operated with remote controls or smartphone apps, adding convenience to your daily routine.

For those seeking a more contemporary look, bi-fold garage doors offer a stylish solution that maximizes space while adding a touch of sophistication to your home’s facade. Bi-fold doors consist of multiple panels that fold horizontally, creating a seamless transition between indoor and outdoor spaces. This innovative design not only saves space but also enhances curb appeal, making it an attractive option for modern homeowners looking to make a statement.

In addition to choosing the right type of garage door, maximizing space also involves careful consideration of storage solutions and layout optimization. Utilizing wall-mounted shelving, overhead racks, and modular cabinets can help free up floor space and keep your garage organized and clutter-free. Furthermore, incorporating multifunctional furniture, such as fold-down workbenches and compact storage units, can maximize usability without compromising on space.

Innovative design solutions, such as vertical lift garage doors, offer a space-saving alternative for homeowners with limited ceiling clearance. Unlike traditional overhead doors that swing outwards, vertical lift doors move vertically upwards before transitioning into a horizontal position along the ceiling. This vertical operation minimizes the space required for the door’s movement, allowing for efficient use of both interior and exterior space.

Another emerging trend in compact garage door design is the use of materials that maximize natural light penetration. Glass garage doors, for example, not only create a sleek and modern aesthetic but also flood the interior space with natural sunlight, reducing the need for artificial lighting during the day. This not only enhances the overall ambiance of the garage but also contributes to energy savings and sustainability.

In conclusion, based from Garage Door Repair, maximizing space in the garage requires thoughtful consideration of both design and functionality. With a wide range of compact garage door options available, homeowners can choose the perfect solution to suit their space constraints and lifestyle needs. Whether opting for sectional doors, roller shutters, bi-fold doors, or innovative vertical lift systems, the key is to prioritize efficiency, aesthetics, and usability. By incorporating space-saving strategies and embracing innovative design solutions, you can transform your garage into a versatile and stylish space that enhances the overall functionality and value of your home.

JT’s Overhead Doors

307 N Sandal, Mesa, AZ 85205, United States

480-662-3315

A Comprehensive Guide to Repairing a Leaking Roof – Best Roofing Solution – Santa Ana

As a homeowner who has faced the frustration and anxiety of dealing with a leaking roof, I understand the urgency and stress that comes with addressing this common household issue. A leaking roof not only compromises the integrity of your home but can also lead to costly water damage and mold growth if left untreated.

In this Roofing Santa Ana CA guide, I’ll share practical steps and tips on how to identify, diagnose, and repair a leaking roof, empowering homeowners to tackle this challenge with confidence and effectiveness.

Identifying the Source of the Leak:

  1. Interior Inspection: Begin by conducting a thorough inspection of the interior of your home to identify signs of water intrusion. Look for water stains on ceilings, walls, and around windows and doors, as well as any dampness or discoloration in attic spaces. Follow the path of the water stains to trace the source of the leak back to the roof.
  2. Exterior Examination: Once you’ve identified potential leak areas from inside, it’s time to inspect the exterior of your roof. Look for missing, damaged, or lifted shingles, as well as cracks or gaps in flashing around chimneys, vents, and skylights. Check for debris buildup in gutters and downspouts, which can block water flow and contribute to leaks.
  3. Attic Inspection: If accessible, conduct an inspection of your attic space to assess the condition of the roof deck and insulation. Look for signs of moisture, such as water stains, mold growth, or rotting wood. Use a flashlight to inspect the underside of the roof for any visible signs of leaks or damage.

Repairing the Leak:

  1. Temporary Measures: If you discover an active leak, take immediate action to minimize water damage by implementing temporary measures. Place buckets or containers to catch dripping water and use towels or mops to soak up excess moisture. If possible, apply roofing cement or patching material to temporarily seal the leak until permanent repairs can be made.
  2. Replacing Damaged Shingles: If the leak is caused by damaged or missing shingles, carefully remove the affected shingles using a pry bar or hammer. Replace them with new shingles of the same type and color, ensuring proper alignment and secure fastening. Seal the edges of the new shingles with roofing cement to prevent water infiltration.
  3. Repairing Flashing: Flashing is a common source of roof leaks, especially around chimneys, vents, and skylights. To repair flashing leaks, carefully remove the damaged or deteriorated flashing using a pry bar or utility knife. Clean the area thoroughly and install new flashing, ensuring a tight seal around the penetration. Secure the flashing with roofing nails or screws and apply roofing cement to seal the edges.
  4. Sealing Roof Penetrations: Roof penetrations such as vents, pipes, and chimneys are vulnerable areas for leaks. Inspect the seals around these penetrations for signs of cracking or deterioration. Apply roofing caulk or sealant to seal any gaps or cracks and prevent water infiltration. For added protection, consider installing a flashing boot or collar around roof penetrations to provide a watertight seal.
  5. Repairing Roof Deck Damage: In cases where the leak has caused damage to the roof deck or underlying structure, repairs may be more extensive. Carefully remove any damaged or rotted wood and replace it with new decking material. Ensure proper ventilation and insulation to prevent future moisture buildup and deterioration.
  6. Professional Assistance: For complex or extensive roof repairs, or if you’re unsure about tackling the job yourself, it’s advisable to seek professional assistance. A qualified roofing contractor can assess the extent of the damage, recommend appropriate repairs, and ensure that the work is completed safely and effectively.

Preventive Maintenance:

  1. Regular Roof Inspections: Schedule regular inspections of your roof, ideally once or twice a year, to identify and address potential issues before they escalate into leaks. Look for signs of damage or wear and tear, such as loose or missing shingles, damaged flashing, or debris buildup in gutters.
  2. Prompt Repairs: Address minor issues promptly to prevent them from becoming larger problems. Don’t ignore small leaks or damage, as they can worsen over time and lead to more extensive water damage and costly repairs.
  3. Gutter Maintenance: Keep gutters and downspouts clear of debris to ensure proper water drainage from the roof. Clean gutters regularly and inspect them for damage or sagging. Consider installing gutter guards to prevent debris buildup and reduce maintenance requirements.
  4. Trim Trees and Branches: Trim overhanging trees and branches that could potentially damage your roof during storms or high winds. Branches that come into contact with the roof can cause abrasion, punctures, or dislodged shingles, leading to leaks and structural damage.

Conclusion:

Overall, based from Roofing Santa Ana CA, dealing with a leaking roof can be a stressful and daunting task, but by following these steps and tips, homeowners can effectively identify, diagnose, and repair roof leaks. Remember to conduct thorough inspections, address issues promptly, and prioritize preventive maintenance to safeguard your home against future leaks and water damage. If in doubt, don’t hesitate to seek professional assistance to ensure that repairs are completed safely and effectively. With proactive maintenance and timely repairs, you can maintain a watertight roof that protects your home for years to come.

Best Roofing Solution – Santa Ana

2429 W Elder Ave, Santa Ana, CA 92704, United States

714-451-4926

Identifying Roof Truss Damage: Signs You Shouldn’t Ignore – Anaheim’s Best Roofing & Repairs

As a homeowner, I’ve come to appreciate the importance of maintaining the structural integrity of my home, particularly when it comes to the roof. Roof trusses play a critical role in supporting the weight of the roof and distributing it evenly to the walls of the house. However, like any structural component, roof trusses can be susceptible to damage over time.

In this article, I’ll share insights into the signs of damaged roof trusses that homeowners should be aware of, offering guidance on when to seek professional assistance to address potential issues by following Roofing Anaheim CA.

Understanding Roof Trusses

Before discussing the signs of damaged roof trusses, it’s essential to understand what roof trusses are and their function in the overall structure of a roof:

  • Definition: Roof trusses are engineered components made up of triangular-shaped frames constructed from wood or metal. They are designed to support the weight of the roof and transfer it to the load-bearing walls of the house.
  • Function: Roof trusses provide structural support and stability to the roof, ensuring that it can withstand the forces of gravity, wind, and other external factors. They also help distribute the weight of the roof evenly across the walls, preventing sagging or collapse.

Signs of Damaged Roof Trusses

Now let’s explore some of the signs that may indicate damage to roof trusses:

  1. Visible Sagging or Bowing: One of the most obvious signs of damaged roof trusses is visible sagging or bowing of the roofline. This may appear as a dip or curve in the roof surface, particularly along the ridgeline or at the eaves. Sagging or bowing may indicate that the roof trusses are unable to support the weight of the roof properly.
  2. Cracks or Splitting: Inspect the roof trusses for signs of cracks, splitting, or separation at the joints or connection points. Cracks may indicate structural weakness or stress on the trusses, while splitting may occur due to moisture damage or age-related deterioration.
  3. Loose or Missing Connections: Check the connections between the roof trusses and the walls of the house for signs of looseness or detachment. Loose or missing connections can compromise the stability of the roof trusses and lead to structural failure.
  4. Water Damage: Water damage is a common cause of deterioration in roof trusses, particularly in areas prone to leaks or moisture intrusion. Look for signs of water stains, rot, or mold growth on the surface of the trusses, as well as in the surrounding insulation or sheathing.
  5. Pest Infestations: Pest infestations, such as termites or wood-boring insects, can cause significant damage to roof trusses over time. Look for signs of insect activity, such as tunnels, holes, or sawdust-like debris near the trusses. Pests can weaken the structural integrity of the trusses and compromise their ability to support the roof.
  6. Unusual Noises or Creaking: Pay attention to any unusual noises or creaking sounds coming from the roof or attic space. These noises may indicate that the roof trusses are under stress or experiencing movement, potentially due to structural damage or shifting of the roof load.
  7. Visual Inspection: Conduct a visual inspection of the roof trusses from inside the attic or crawlspace, if accessible. Look for signs of damage, deterioration, or movement, such as twisted or warped members, loose or missing fasteners, or signs of stress on the connections.

What to Do If You Suspect Roof Truss Damage

If you notice any signs of damaged roof trusses, it’s essential to take prompt action to address the issue and prevent further damage. Here are steps to follow:

  1. Consult a Professional: If you suspect roof truss damage, it’s best to consult with a qualified structural engineer or roofing contractor. They can assess the extent of the damage, determine the underlying cause, and recommend appropriate repairs or reinforcements.
  2. Schedule Repairs: Based on the recommendations of the professional, schedule repairs or reinforcement of the damaged roof trusses. This may involve repairing cracks, reinforcing connections, replacing damaged members, or treating for pest infestations.
  3. Address Underlying Issues: Address any underlying issues contributing to the damage, such as water leaks, moisture intrusion, or pest infestations. Fixing these issues will help prevent future damage to the roof trusses and ensure the long-term stability of the roof.
  4. Regular Maintenance: Implement a regular maintenance schedule to inspect and maintain the roof trusses and the overall roof system. This includes checking for signs of damage, clearing debris from the roof surface, and addressing any issues promptly to prevent further damage.

Conclusion

In conclusion, based from Roofing Anaheim CA, recognizing the signs of damaged roof trusses is essential for maintaining the structural integrity and safety of your home. By being vigilant and proactive in identifying potential issues, homeowners can address roof truss damage promptly and prevent further deterioration. Remember to consult with a qualified professional if you suspect roof truss damage and follow their recommendations for repairs or reinforcement. With proper maintenance and timely intervention, you can ensure that your roof trusses continue to provide reliable support for your roof for years to come.

Anaheim’s Best Roofing & Repairs

2144 W Churchill Cir, Anaheim, CA 92804, United States

714-464-7146

« Older posts